1. 安装依赖
npm i redux, react-redux -S
2. 安装 Chrome 调试插件
Redux DevTools 设置:
const store = createStore(
reducer,
window.__REDUX_DEVTOOLS_EXTENSION__ && window.__REDUX_DEVTOOLS_EXTENSION__()
);
3. createStore 源码
以下是 redux 中 createStore 代码的简化版:
function createStore (reducer, preloadedState, enhancer) {
let currentReducer = reducer // 存放 reducer
let currentState = preloadedState // 闭包,存放 state
let currentListeners = []
let nextListeners = currentListeners // 存放所有的 listener
let isDispatching = false
function getState () {
return currentState // 返回闭包中 state 的结果
}
function subscribe (listener) {
nextListeners.push(listener) // 新增 listener
return function unsubscribe () {
const index = nextListeners.indexOf(listener)
nextListeners.splice(index, 1) // 移除 listener
}
}
function dispatch (action) {
if (isDispatching) {
// 防止在 reducer 中再次执行 dispatch
throw new Error('Reducers may not dispatch actions.')
}
try {
// 执行 dispatch 时,dispatch 为 true
// 相当于锁住了该状态,比如,防止在 reducer 中再次执行 dispatch
isDispatching = true
// 将闭包的 state, 和 action 进行计算,从而更新 state
currentState = currentReducer(currentState, action)
} finally {
isDispatching = false
}
// 在 dispatch 之后,通知所有的 listener
const listeners = (currentListeners = nextListeners)
for (let i = 0; i < listeners.length; i++) {
const listener = listeners[i]
listener()
}
return action
}
dispatch({ type: `@@redux/INIT+随机数` })
return {
dispatch,
subscribe,
getState
}
}
即实际上就是通过闭包创建 state,同时对外暴露更新 state 数据( dispatch 方法)和获取 state 数据( getState 方法 ) 的实现。
4. 简单示例
import React from 'react'
import ReactDOM from 'react-dom'
import { Provider, connect } from 'react-redux'
import { createStore } from 'redux'
### 定义 reducer ###
const initialState = 0 // 初始 state
// reducer 就是一个函数,接受当前的 state 和 action,返回新的 state
const reducer = (state = initialState, action) => {
switch (action.type) {
case 'ADD':
return state + action.payload
default:
return state
}
}
### 定义 action ###
const action = {
type: 'ADD',
payload: 2
}
### Dispatch 组件 ###
const Dispatch = connect()(props => {
function handleClick () {
props.dispatch(action)
}
return <div onClick={handleClick}>
click me, + 2
</div>
})
### mapStateToProps ###
const mapStateToProps = (state, ownProps) => {
console.log(ownProps) // ownProps 为组件自身 props,在此例中,是 { a: 1 }
return {
count: state
}
}
### Show 组件 ###
const Show = connect(
mapStateToProps
)(props => {
console.log(props)
return <div>
show state {props.count}
</div>
})
### App 组件 ###
function App () {
return <div>
<Dispatch />
<Show a={1} /> // {a:1} 是 Show 组件自身的 props
</div>
}
### 创建 Store 对象 ###
// createStore 接受一个 reducer 作为参数
const store = createStore(
reducer,
window.__REDUX_DEVTOOLS_EXTENSION__ && window.__REDUX_DEVTOOLS_EXTENSION__()
)
### render ###
ReactDOM.render(
<Provider store={store}>
<App />
</Provider>,
document.getElementById('root')
)
如上所示,就是简单的 redux demo,来总结几点:
reducer 就是一个函数,接受当前的 state 和 action,返回新的 state. 可以在 reducer 中定义 state 初始值。
action 是一个对象,应该有 type 和 payload 两个属性,分别用于描述这是什么类型的 action,以及 该 action 携带的值。其中 type 是必填的。对于 action 还有一个社区规范, action 社区规范
一个组件被 connect 之后,props 上就会有 dispatch
方法,该方法的使用示例: dispatch(action)
如果一个组件需要接受 redux 中的 state,必须定义 mapStateToProps
, mapStateToProps
的第二个参数 ownProps
为组件自身的 props。 此时当 redux 中的 state 发生变化,props 就会发生改变。
5. 什么是 Action Creator
在之前的示例中,我们这样定义 action
const action = {
type: 'ADD',
payload: 2
}
这样的问题在于,有多少个 action 就需要定义多少个这样的变量。于是就诞生了 Action Creator
function addTodo(text) {
return {
type: 'ADD',
text
}
}
const action = addTodo('Learn Redux');
即,ction Creator 就是一个函数,用于创建 action。
6. Reducer
const reducer = (state = initialState, action) => {
switch (action.type) {
case 'ADD':
return state + action.payload
default:
return state
}
}
可能会好奇,为什么这个函数叫做 reducer 呢? 因为,这个函数可以作为 数组 reduce 方法的参数
const actions = [
{ type: 'ADD', payload: 0 },
{ type: 'ADD', payload: 1 },
{ type: 'ADD', payload: 2 }
];
// arr.reduce((previousValue, current) => {})
const total = actions.reduce(reducer, 0); // 3
6.1 reducer必须是纯函数
因此 Reducer 函数里面不能改变 state,而必须返回一个全新的对象:
// State 是一个对象
function reducer(state, action) {
return Object.assign({}, state, { thingToChange });
// 或者
return { ...state, ...newState };
}
// State 是一个数组
function reducer(state, action) {
return [...state, newItem];
}
7. Reducer 的拆分
在简单示例中,redux state 是一个简单值,state = 0
在实际开发中, state 可能是一个对象: state = { foo: xxx, bar: xxx }
示例代码:
const initialState = { // 初始 state
foo: {
count: 0
},
bar: {
count: 0
}
}
const reducer = (state = initialState, action) => {
switch (action.type) {
case 'ADD_FOO':
return Object.assign({}, state, {
foo: {
count: state.foo.count + 1
}
})
case 'ADD_BAR':
return Object.assign({}, state, {
bar: {
count: state.bar.count + 2
}
})
default:
return state
}
}
const actionFoo = {
type: 'ADD_FOO',
payload: 1
}
const actionBar = {
type: 'ADD_BAR',
payload: 2
}
const Dispatch = connect()(props => {
return <div>
<div onClick={() => props.dispatch(actionFoo)}>
action foo, + 1
</div>
<div onClick={() => props.dispatch(actionBar)}>
action bar, + 2
</div>
</div>
})
const mapStateToPropsFoo = (state, ownProps) => {
return {
foo: state.foo
}
}
const Foo = connect(
mapStateToPropsFoo
)(props => {
return <div>
foo {props.foo.count}
</div>
})
const mapStateToPropsBar = (state, ownProps) => {
return {
bar: state.bar
}
}
const Bar = connect(
mapStateToPropsBar
)(props => {
return <div>
bar {props.bar.count}
</div>
})
function App () {
return <div>
<Dispatch />
<Foo />
<Bar />
</div>
}
const store = createStore(
reducer,
window.__REDUX_DEVTOOLS_EXTENSION__ && window.__REDUX_DEVTOOLS_EXTENSION__()
)
ReactDOM.render(
<Provider store={store}>
<App />
</Provider>,
document.getElementById('root')
)
在上面这个示例中, foo 和 bar 是 state 的两个根属性(实际开发中,可能对应两个子组件,子页面),其实是互不影响,但是他们的 Reducer 却写在了同一个文件中,在大型应用中,必然导致 Reducer 函数非常庞大
于是我们尝试将 Reducer 拆分为两个小文件:
// 单独的 foo reducer
// 此时的 state 即为 state.foo
const fooReducer = (state, action = {}) => {
switch (action.type) {
case 'ADD_FOO':
return Object.assign({}, state, {
count: state.count + action.payload
})
default:
return state
}
}
// 单独的 bar reducer
const barReducer = (state, action = {}) => {
switch (action.type) {
case 'ADD_BAR':
return Object.assign({}, state, {
count: state.count + action.payload
})
default:
return state
}
}
// 初始 state
const initialState = {
foo: {
count: 0
},
bar: {
count: 0
}
}
const reducer = (state = initialState, action = {}) => {
return {
// 只传入对应的 state 根属性
foo: fooReducer(state.foo, action),
bar: barReducer(state.bar, action)
}
}
即通过将对应的 子 state,传入到子 reducer 中,从而更新根 state.
redux 内部也暴露了 combindReducers
来组合 子 reducer:
注意,默认 state 的定义划分到子的 reducer 里了
import { createStore, combineReducers } from 'redux'
// 注意, 此时 initialState 是在这里定义 `state = { count: 0 }`
// 最终形成的根初始state 为 `state = { foo : { count: 0 } }`
const fooReducer = (state = { count: 0 }, action = {}) => {
switch (action.type) {
case 'ADD_FOO':
return Object.assign({}, state, {
count: state.count + action.payload
})
default:
return state
}
}
const barReducer = (state = { count: 0 }, action = {}) => {
switch (action.type) {
case 'ADD_BAR':
return Object.assign({}, state, {
count: state.count + action.payload
})
default:
return state
}
}
const reducer = combineReducers({
foo: fooReducer,
bar: barReducer
})
// 等同于
function reducer(state = {}, action) {
return {
foo: fooReducer(state.foo, action),
bar: barReducer(state.bar, action)
}
}
因此,我们可以大概写出 combineReducers 的实现:
const combineReducers = reducers => {
return (state = {}, action) => {
return Object.keys(reducers).reduce(
(nextState, key) => {
nextState[key] = reducers[key](state[key], action);
// 如 nextState['foo'] = reducers['foo'](state['foo'], action);
return nextState;
},
{}
);
};
};
同时,如果 fooReducer 改为 foo, 那么可以简写:
import { createStore, combineReducers } from 'redux'
// 命名为 foo
const foo = (state = { count: 0 }, action = {}) => {
switch (action.type) {
case 'ADD_FOO':
return Object.assign({}, state, {
count: state.count + action.payload
})
default:
return state
}
}
// 可以简写
const reducer = combineReducers({
foo,
bar
})
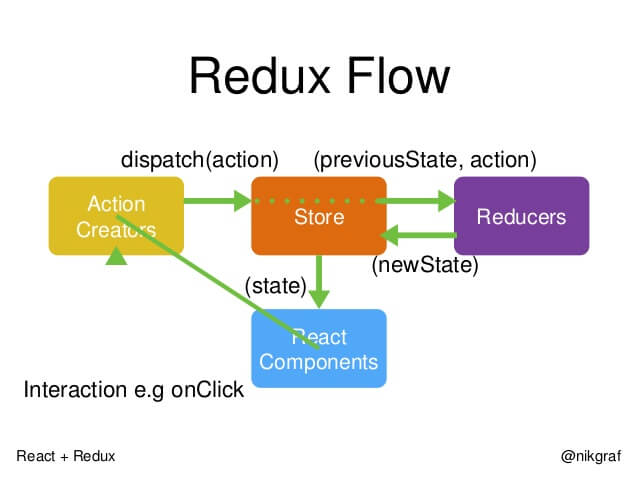
8. 工作流程梳理
以下是 redux 的工作流程图:
store 通过 matchStateToProps,将数据更新到 React Component 上
组件点击时,dispatch( actionCreator(xx) )
, 其中 actionCreator(xx)
会生成一个 action
当 dispatch(action) 时,redux 内部会将 (state,action) 作为参数传入到 Reducers 里
Reducers 通过执行完,返回新的 state。此时 store 通过 matchStateToProps 再更新 React Component
参考文档